Category Archives: OS – Windows Vista


Losing Data is No Longer the End of the World
Data recovery is the last thing on our minds when we are busy.

Data Recovery Equipment
We’ve all been there. Despite knowing that we need to save our work at regular intervals and backup everything, there is always going to be that time when you’re engrossed in what you’re doing and have ploughed on regardless with that complex spreadsheet, calculations or report. You’ve almost finished, 5 o’clock is in sight, and backing up or saving your data is the last thing on your mind. But you can guarantee that will be exactly the moment when you have a power cut. And suddenly the screen is blank and everything has gone.
Even when you have been as careful as can be and saved every last meg on your external hard drive, you can never guarantee that your dog won’t decide to make a tasty meal out of it and have a good old chew.
Well breathe a sigh of relief as this no longer means the loss of all your hard work. Thankfully there are now expert data recovery organisations out there who can not only retrieve data you thought that you had lost, but can offer you a wealth of information and advice about how to stop it happening again. Both the emergency services and the GP of data recovery all-in-one.
These guys can also advise you on which of the wide range of data recovery systems and equipment are the best value for money and meet your individual needs.
Unfortunately they weren’t able to advise on how to tempt my dog into eating dog food instead of electrical equipment.
Related articles
- How to Use File Recovery Software (answers.com)
- Is data recovery really that expensive? (stellarphoenixs.wordpress.com)
- Data Recovery for Mac (smithshell.typepad.com)
- How to Do File Repair (jenneqing.typepad.com)
- DataRecoveryAgents.com Ushers in New Era of Information in Pursuit for Best Data Recovery Products (prweb.com)
- Review: Stellar Phoenix Mac Data Recovery (techie-buzz.com)
- Power Data Recovery Software (daniweb.com)
- Gottagetarecovery.com Reveals Its Best Data Recovery Technology to Date (prweb.com)
- Recovery Hard Drive Files (jenneqing.typepad.com)
- Get more music for free (djnykeh.com)
- DJ Nykeh (Bangalore) (djnykeh.com)
Difference between sleep and hibernation
What is the difference between sleep and hibernation in Windows?
Sleep:
When you set your computer to sleep [or done automatically with power settings], what happens is that as the computer shuts down, the contents currently in use or running will be saved to the computer’s memory and the computer is shut down. To turn the computer on, press the computer’s power button.
Advantage: Shuts down and starts up the computer quite fast.
Disadvantage: For a laptop, it relies on your battery or power from an outlet only. If the battery dies and the power adapter not plugged in or if the battery dies and there is a power failure, whatever was running is lost. Documents will be saved if saved prior to going into sleep mode.
For a desktop, it relies on the computer’s power from an outlet only. If there is a power failure, whatever was running is lost. Documents will be saved if saved prior to going into sleep mode.
Hibernation:
With hibernation, when your computer is shut down, the contents currently in use or running will be saved to the computer’s hard disk or solid state drive and the computer is shut down. To turn the computer on, press the computer’s power button.
Advantage: Whatever you had open or was running as the computer shuts down is saved to your hard disk or solid state drive. Even if the laptop’s battery dies or there is a power failure, you will not lose anything that has been saved.
Disadvantage: Shuts down and start up is slower. Although if your computer has a solid state drive, then the shut down and start up isn’t as bad but still slower than sleep.
Notes:
If your computer is connected to a battery backup [a.k.a. uninterruptable power supply (UPS)], the UPS will keep the computer “alive” for a little while if there is a power failure. If the UPS software from the manufacturer is installed, the UPS will shut down the computer – a full shut down – not sleep or hibernate.
Power options or settings can be set in the Control Panel. From here you can dictate when to shut certain hardware off to conserve power [or battery life] as well as when the computer shuts down.
Review your computer’s manual as there may be other ways to wake your computer from sleep or hibernation.
To see how to conserve your battery see http://wp.me/p1wU4v-ZN
Easy Steps to Improve Your PC’s Boot Up
The second step is a little more complicated but still very easy to perform. Not all of the programs that load when your computer will be located in your startup folder on the start menu. Actually in most new operating systems the startup folder is usually empty. To remove these files, you will need to run your system configuration utility. To do this simply click start, run, and type msconfig, and press enter. You will then see the system configuration utility appear. Here you simply click the startup tab and check or uncheck what programs you wish to run or not at startup. Be careful not to change the settings anywhere but the startup tab as this can cause problems with your computers performance. Only change the settings under the startup tab unless you are an experienced user.
Un checking the programs in the configuration utility or removing programs from the startup folder will not delete these programs from your computer, it will simply not load them when your computer first boots up. These programs can still be opened up and accessed anytime you need them by simply double-clicking them as you normally would.
The above tips will help your computer to boot a lot faster and more efficiently so that you do not have to wait forever to surf the web or work on that spreadsheet you need to update. Cleaning your startup is a simple and effective way to increase your boot time by a lot. So follow the above tips and you’re on your way to a faster boot the next time you press that power button!
10 Reasons Why PCs Crash you must Know

Fatal error: the system has become unstable or is busy,” it says. “Enter to return to Windows or press Control-Alt-Delete to restart your computer. If you do this you will lose any unsaved information in all open applications.”
1. Hardware conflict
2. Bad Ram
3. BIOS settings
4. Hard disk drives
6. Viruses
7. Printers
8. Software
9. Overheating
10. Power supply problems
Strategies For Removing Malware and Viruses

Perhaps these tips will save you some money during these dark economic
times. I can’t promise that these tips will work for you but for the DIY user who’s not afraid to get their hands dirty, it might prove to be very useful. So lets get right to it:
Phase 1: Safe Mode (with networking?)
Almost every version of Windows out there (from Windows 95 all the way up to the most recent Windows 7) have a hidden menu you can access at boot that gives you access to a diagnostic profile called Safe Mode. Safe Mode is a sort of back door mode into Windows that loads the absolute (or nearly) bare minimum of device drivers and background services. It’s sort of a bare bones environment that is suitable to start your repair from primarily because most viruses aren’t auto-started by the system in this mode, but it’s not perfect. More on that in a moment.
To access Safe Mode you need to press the F8 key on your keyboard at a VERY specific time. Typically when you turn your computer on you’ll see a screen that either has the logo of the manufacture of the PC or perhaps some generic startup relating to your BIOS. At some point that all goes away, your screen will be black for about 3 seconds, and then Windows will proceed to boot with the little scroll bar loading away. It’s during (or just before) that 3 second window of blackness that you need to start tapping the F8 key. If done correctly, you’ll be presented with a menu that looks like this:
 You’ll use the arrow keys on your keyboard to move the highlighting selector bar. Typically I will select Safe Mode With Networking, as this allows me to access the Internet and download utilities as well as give these utilities access to definition updates for itself later.
After you select Safe Mode With Networking and press Enter your screen will be bombarded with a slathering of strange and mysterious words…
 Don’t worry, this is normal. (Note: If instead of this screen above you get another menu asking what version of Windows you want to boot, just press Enter again).
Eventually you will get to the familiar blue colored user login screen and you might see an account called Administrator shown there that you’ve never seen before. If you do, go ahead and select it to log in as “Administrator”. Otherwise, select your own user name.
Once you’re logged in you have a few options you can take. The safest way to get started is to actually bring a copy of your utility software with you on a thumb drive or CD to install it from, instead of downloading via a web browser. The reason it’s not a good idea to try and download via a web browser is because a lot of viruses tend to wrap themselves around a browser’s EXE file so that when the browser starts, so does the virus. This could potentially happen with a lot of other software so it’s best to try and resist the temptation to run any programs except for the cleaning utilities we’re about to install.
Phase 2: Cleaning
There are only three pieces of software I typically use with great success in the field for removing viruses and malware. They are:
All of the above are free with the exception of Malwarebytes, which functions with all its features on a 30 day trial when you first install it (note that you will see an error message appear when you tell it to start the trial while in Safe Mode; this is normal and you can ignore the error by clicking the OK button when it appears). To keep the full version running you have to buy it for the low one-time payment of $25 and I strongly recommend it. Apart from these three the only other tool I use is Google, which I’ll use to lookup exact phrases found within suspicious malware to see if I can find other people talking about that particular virus somewhere online and hopeful discover what unique thing they did to remove it. Fair warning: Your mileage may vary.
I typically start by installing Malwarebytes first (however I have had one experience where I wasn’t able to do this until after I ran Combofix so you might need to flip the order of these two tasks), applying the most recent update for it and then running a full scan, removing all infected objects it finds. A typical scan can take around a half hour to do. When it’s finished, you just need to click the “Show Results” button and then make sure the results listed all have check marks next to them and then click “Remove Selected” in the bottom left. If an object doesn’t have a check mark when you first view the results it means Malwarebytes thinks it could be a false-positive result. Use your best judgment and google to determine if either the file is malicious and/or if the file is a necessary part that can be removed without grief. A reboot will likely be required when it is finished. Be ready to hit F8 again when you do this so you can come back into Safe Mode and continue your work.
One thing I’ll often do while I’m waiting for a Malwarebytes scan to complete is take a look at the MS Config utility and see what items are enabled to auto-start when you boot into the system. To access this, click Start, then click Run (or just click into the search box if you’re using Windows 7) and type in “msconfig” without the quotes into the box and click OK. Then click the Startup tab at the top.

In this startup list are programs that are told to run right away when you first log into your system. Almost all of these items are non-essential and to be on the safest side you could probably get away with unchecking all of these items, but that’s usually overkill and might rob you of some convenient feature you’d like to have. Look carefully down the list for items that have empty path names, or very bizarre characters in their name… I have to admit that at this point experience with this stuff comes in to play. If you don’t know what something is you could look it up by name with google on a separate computer before deciding to uncheck it Alternatively, you could use the uncheck-all-the-things strategy and then go back later to add check marks back into the few items you know you need enabled. You can also check out the Services tab which is to the left of the Startup tab, check the box that says “Hide all Microsoft items” and then use the same judgment to decide if there are third-party services running in the background that don’t need to be. Google is your friend here for helping to determine if a service is useful or not.
Another thing I’ll do while waiting for a scan to complete is open the Add/Remove Program (Programs & Features) applet from the Control Panel to view all the software that’s been installed on the system. I target toolbars of any kind first, next by software that is unfamiliar to the user. Again, google is a useful reference here because you don’t want to remove something that’s known to not be malicious.
The next step is to run Combofix which you can find a tutorial about by clicking here. It is pretty strait forward: double-click on the combofix.exe file that you downloaded and follow the on screen instructions. It’s own scan will also take about 30 minutes or so but it is very sensitive so once you kick it off, don’t touch the computer until its finished. There is almost no interaction required with the software and it will automatically remove anything malicious it finds, producing a log with a lot of interesting jargon at the end that you can forward on to an expert for further analysis if you’d like.
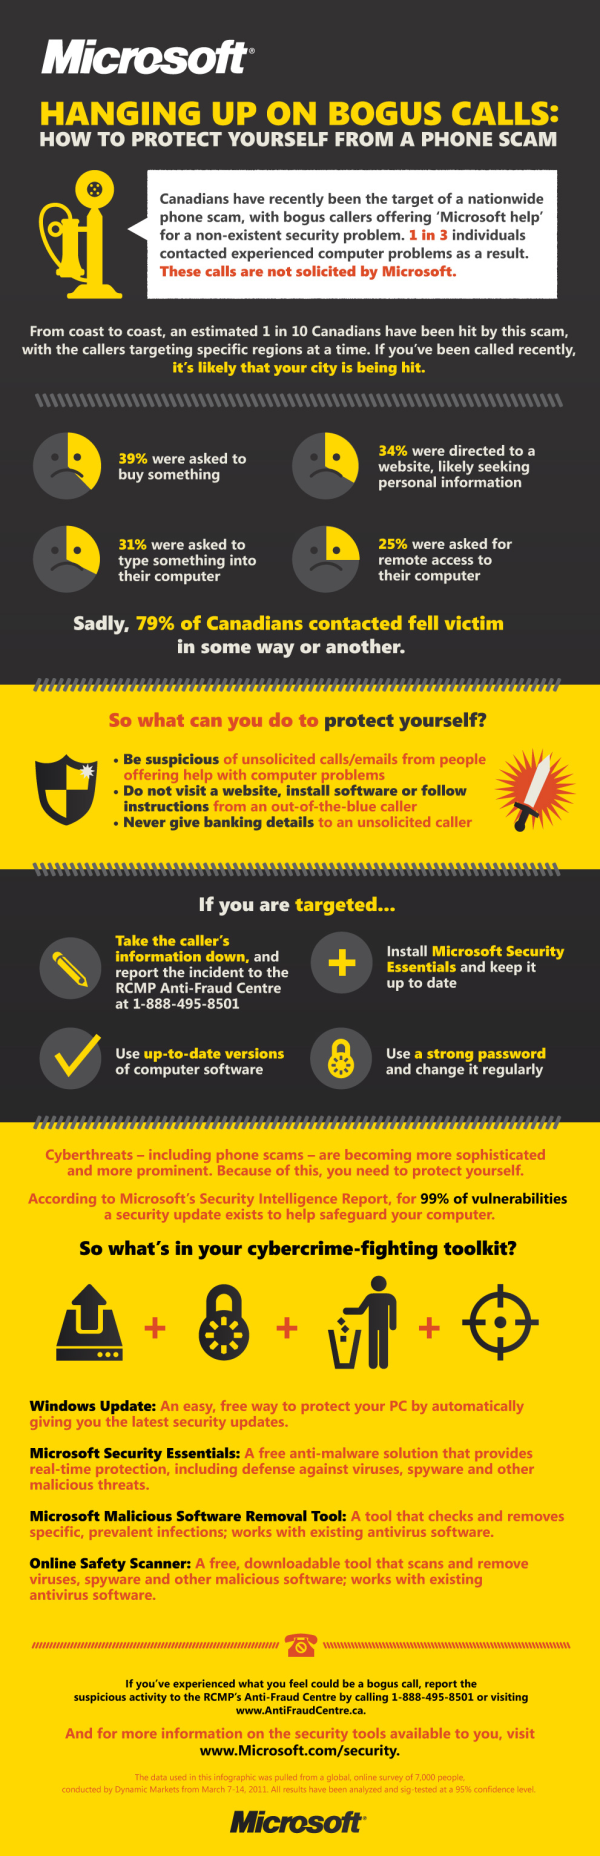
After all this I’ll typically reboot the system and let it boot normally and then install Microsoft Security Essentials, running a full scan with it right after and checking to make sure the trial mode has been enabled on Malwarebytes.
If all of the above didn’t work, something I’ll try next is to reboot back into safe mode and use the control panel to create a new user account, then log off and log back in under that new account and repeat all the same steps above. The reason this might help is because viruses tend to damage registry entries for accounts that existed when it found and infected the system. Because we’re creating a new account in an environment that hopefully didn’t auto-launch the virus, we can then create a fresh account with it’s own default settings and preferences that hopefully won’t be manipulated by the virus. This kind of problem could also be reversed using the System Restore utility but I’ve found that a lot of times (not always) I try to use this utility none of the restore points are any good. I wouldn’t be surprised if previous restore points are destroyed by certain viruses making it even more difficult to undo the damage done. In situations like that I’ve occasionally just created a new user account and migrated all the important user data (documents, etc.) from the old account to the new account, deleting the old one in the end because it’s irreversibly broken.
One last tip I’ve run across in a training video for a competitor of mine who will remain unnamed is to shut the system off by force instead of doing a soft reboot during this cleaning process. In other words, hold the power button down for 5 seconds and then turn the computer back on after 20 seconds. The reasoning behind this is that there are a few viruses out there that alter the shutdown script of events that take place during an ordinary shutdown and one of the events it injects into the script is to reinstall the virus during shutdown from a rogue location, as a Plan B so even if the live version of the virus is caught and removed it might be able to recreate the file from an encrypted copy of itself elsewhere. If you decide to do this my only advice would be to backup the entire hard drive before doing so. It’s technically dangerous… but probably not THAT dangerous… it’s best to remain on the safe side and not use shortcuts.
Finally a word about a couple of common viruses in particular I’ve run into in the last year:
A few of these viruses going around exhibit the symptom of making all your files and shortcut icons on the desktop vanish. This is often done with a combination of changing the file attributes to enable the hidden flag, or by moving the files to a hidden location. It is sometimes also conjoined with malware that tries to frighten you into thinking your hard drive is on the verge of failure, or at the least, claims to be antivirus software itself. The goal of all such attempts is to get you to give up your credit card number. Please don’t.
I’ve had great success removing the virus that causes these files to go missing but after it’s been removed it’s not always so easy to reverse the damage and restore the missing icons. Fortunately there is one program out there that, for the most part, has been able to do this for me very simply and it’s simply called “Unhide”. Use this program after going through all the above steps to be sure you’ve removed traces of the virus and hopefully it will get all of your stuff back for you. You can download Unhide from here.
One other common symptom I’ve seen certain viruses exhibit is hijacking certain registry entries to alter file associations, specifically one which makes your computer forget what to run EXE files with, asking instead what program you’d like to open another program with. I have found that in Windows 7 one trick of working around this is to right-click on a program shortcut and then click Run as Administrator. This uses a separate registry association which hopefully has not been affected by the virus. Using this Right-Click>Run as Administrator trick you should be able to run your scanning utilities like Malwarebytes and Combofix from within Safe Mode.
Phase 3: Prevention
Now that we know how much of a pain these kinds of viruses can cause we should talk a little about where they come from and the different ways they can end up on your computer. I wrote a much longer blog about this topic which you can read here. Basically it boils down to this:
- Make sure you install all available software updates for Windows itself as well as 3rd party software and plugins like Adobe Flash, Acrobat and Java (among others). Updates are your friend and help to patch recently discovered security vulnerabilities.
- Pay attention to links people send you in emails. It’s quite possible their email account has had its password stolen and is being used by a robot to send spam email with links to malicious websites out to everyone in their address book. Warn your friends if you suspect their account has been compromised and suggest they change their email accounts password before following the steps above to attempt to remove a potential infection.
- Use good anti-virus software. As recommended above, I prefer MSE and Malwarebytes. Combofix is only to be used as an emergency utility; it doesn’t have a real-time monitoring feature.
- Consider using a software firewall to block unwanted inbound traffic and unexpected outbound traffic. Zone Alarm Free is an excellent choice for this.
- Use an ad-blocking plugin to further reduce the chances of a virus sneaking in through a flash-based advertisement. Ad-Block for Firefox is a great option. You can also get it for Google Chrome from here.
- Along with these plugins, consider using a better browser. Mozilla Firefox and Google Chrome have both become superior to Internet Explorer, especially in terms of security.
- Avoid installing “toolbars” for your browser. If you install one by accident, disable it in your browser or better yet uninstall it via your control panel.
- Avoid using P2P file-sharing software like Frostwire or MP3Rocket. These methods of file sharing do not have any form of user moderation and anybody can wrap a virus inside a file then name it something innocent/sensational looking to trick people into downloading it and installing a virus.
- Consider adding a parental filter to your computer; you don’t need kids for this. Having a web filter like K9 Web Protection can be helpful to block your computer from accidentally trying to connect with a known malicious server.
- Lastly, though this is too extreme for most people: Consider switching to Linux on your desktop. Linux is free, open-source and is even more secure than MacOS. Seriously.
I hope this advice has been helpful. Please leave comments or suggestions about other tips and tricks you use to help remove malicious software in the comments section below!
Related articles
- Change my Windows 7 account password? (thinkanytime.wordpress.com)
Beyond Windows Backup
You are backing up your data, right? If not, then please remember that Windows 7 includes Backup and Restore which you can find off the Start Menu in the Maintenance folder. There is some great informationon using Windows Backup and Restore on the Windows website.
")
As a techie I don’t need to extoll the virtues to you of creating regular backups. But backups are only useful if you can restore what you want when you want to. Over the years I’ve learned some tips and techniques (the hard way in some cases) to help make sure my backup system comes through when I need it. As I was backing up my systems at home to prepare for a move it occurred to me to that I should post about my approach to safeguarding my data and making recovery simple if I need to do it.
None of these tips do any good if you don’t backup regularly though so please do that. None of them apply exclusively to the backup features included in Windows either so you can use them no matter what your preference is for backup software.
Testing
If at all possible, test whatever method you use. I’ve heard stories from people about going back to a backup only to discover they hadn’t really prepared as well as they thought. Quite often this is because they were not backing up all their data. Perhaps they had added a new drive at some point or moved where they were storing files but the point is the data they needed wasn’t there. Another situation that I’ve experienced personally is where I thought that the backup would be easy to restore to a ‘bare metal’ or ‘clean’ system if I had a major failure which turned out not to be the case.
You can reduce the chances of a surprise like this by testing your backup system. Not everyone will have what is needed for a full blown test of all scenarios but if you are like me you build and upgrade systems often enough that you occasionally have some ‘spare’ hardware on hand. If you’ve got the hardware you might want to test recovering from a hardware failure such as a disk drive. With a ‘spare’ drive you can carefully disconnect the working one from your system, attach the empty one and practice restoring the whole system. Can you find your system repair disk to get the system booted to access the backup? Did the backup restore properly?
For more simple scenarios you don’t need anything special at all. Simply grab your backup and try to restore a file or two as if you overwrote or deleted it. Did it work? Was it easy?
Covering your bases
Take a few minutes to think about what scenarios you might need to recover from. We all know that backups are important if you need to restore a deleted file or a failed disk but what other scenarios might you want to cover? For instance what about theft or complete loss from flood or fire? What if it wasn’t that your drive failed but that someone stole your laptop? What if someone broke into your home and took your system? Do you use a portable backup disk that is normally connected to the system? What if they took that too? Do you backup to Windows Home Server? What if it was stolen along with your PC?
Certainly covering every possible case is not realistic but I’d say it’s worth it to at least consider which ones you’d want to be prepared for. Keeping the portable backup disk somewhere separate from your other equipment, in a safe or at least well hidden place may help protect against the theft scenario. Backups are insurance and like buying insurance it’s all about what you wish to protect yourself against and what it’s worth to you.
A little help from your friends
Enterprises rely on offsite backups for critical data and it’s actually easier than you think for us ‘non-enterprise’ types to do this too. One of my favorite ways to cover this is with a friend or relative. If you consider it worthwhile you can invest in a portable USB or eSATA backup disk and occasionally relocate it to a secure ‘undisclosed location’ which in my case is commonly known as ‘my mother’s house’. Just take your spare backup drive to a relative’s house when you visit for thanksgiving and leave it there. A few times a year simply bring your latest backup and exchange drives. As an added bonus you can do the same for your relatives by taking theirs home with you. If you are like me you’ll be checking on mom’s system to make sure it’s backed up properly when you visit for the holidays anyway.
You can do this just as easily with other types of media. Instead of an external drive you could occasionally burn critical files to DVD or Blu-Ray and store them at a friends or relatives house. This is a reasonably simple way to cover for theft and fire. I should note that there are backup services that allow you to store data in the cloud that cover this scenario very conveniently. The most common reason I hear for not using them for offsite backups is size. For example a sizable music collection is something you might want to protect that represents a big investment, takes a lot of space and doesn’t change frequently. This is exactly the type of data well suited to archiving remotely.
To wrap this up I’d say that just putting a bit of thought and time in up front can pay off in the end as it always seems like things fail at the worst possible time. I have had hardware failures that could have induced a heart attack but since I was confident that the backups were there and worked properly they were rather stress free and as expected, were easy to recover from.
I’ve captured the tips covered here in a Wiki entry in the Windows Experts Community. If you’ve got more tips or tricks for protecting your data please consider adding them by signing in and editing the page.
3 Things to Love About Internet Explorer 9
1. Pinning and Jump Lists. Given I’ve used desktop shortcuts and IE favorites for years I was a bit skeptical when I first heard of the pinning feature. What I found was that after I tried it I quickly got to the point where I can’t imagine NOT having it. Really. If you haven’t tried this out, you really should and once you do you should show your friends too. It’s that good.
![]()
When I started using it I realized that there are some sites that I use way more often than apps that I have pinned. Pinning them lets me treat these sites like an app. My favorite example of this is Hotmail. From the Jump List I can start composing an email in exactly two clicks. Being able to see the number of new messages in my inbox is just a bonus. I actually respond to my Hotmail email much quicker than I used to when I had it saved in my IE favorites.

All that you have to do is drag the tab at the top of the IE window to your taskbar and let go. You can pin any site to the taskbar but if the site has made a few simple additions you’ll get the full experience of Jump Lists, notifications (like how many new messages in my inbox) and more. There are tons of sites that have done this and you can find many of them listed in the IE Gallery.
If you’ve got a site of your own it’s now easier than ever to enable the full pinning experience for your visitors.
2. Lower power consumption. This might seem like a small thing but it helps wring the most power out of my ‘always too small’ laptop battery and contributes to reducing overall energy use on any system. Sure I use sleep mode and make my screen dim quicker to save battery but those only work when I’m NOT doing something. Using IE9 as my browser saves some energy while I AM doing something.
Measuring this energy savings goes well beyond my efforts to use a Kill-A-Watt to get my PC’s power consumption down. The IE team has a great blog post on the specifics of how they measured this and the results.
3. Hardware acceleration. This one doesn’t get old but I have started to take it for granted. I’ve found myself using a PC that belongs to someone else and having it feel slightly ‘off’ as I browse the web until I realize it’s not running IE9. The full acceleration really contributes to the overall web experience besides creating truly amazing experiences in some specific scenarios. There are a couple great posts on the IE blog about this including a breakdown of the HTML blizzard demo and a rundown on the hardware acceleration architecture.
If you haven’t taken the time to install IE9 you really should check it out. Once you have it installed try out the pinning on your favorite sites. It’s truly one of those things that’s hard to be without after you experience it.
Related articles
- 3 Things to Love About Internet Explorer 9 (thinkanytime.wordpress.com)
How can you Configure AVG Anti-Virus with your Router?
 Have you installed AVG Antivirus in your system? Whether you avail the business version or the home version, you will get firewall protection from it. No intruder can access your PC due to this protection. In spite offering your protection against the hackers, firewall can create certain problems in case you are using router for the home network.
In this case, proper configuration of AVG Anti-Virus software is necessary when router is used to setup the home network. For any such configuration and other services, you can subscribe to the technical support monthly packages to enjoy smooth computing. Any issue with your router, modem and computer will be readily solved.
Step 1 : Right clicking the icon of AVG, choose Open AVG User Interface > click on Components > select Firewall.
Step 2 : Next, click on Configure > choose Create a new configuration, in case you have not run the wizard of configuration. Then select Update Current Settings when you have already run AVG wizard.
Step 3 : When you have connected your computer only to your router, you have to select the option for one computer. However, if multiple computers are connected to the same router, you have to select the network option.
Step 4 : Again, when you are suing wireless router, the selection will be different. The remote technical support professionals are the best guides to help you with the selection process.
Step 5 : Click on Next > Complete Scan > Next for total scanning.
Step 6 : Lastly click on Next and make the choice of the domain according to the computing device you have connected to.

How to fix the problem of a Bluetooth-enabled Dell Travel Mouse?
 The increasing popularity of the laptops has also increased the number of peripheral devices. The travel mouse is one of the devices that come in the line of the peripheral devices. Are you fascinated with a small mouse? Then the travel mouse is the right choice for you. It is a small mouse offering you the ease of transport.
If you are thinking travel mouse from Dell, you can go for the Bluetooth travel mouse with the help of which you can connect your PC wirelessly to your Dell mouse. Enjoy wireless connectivity with your Dell Bluetooth mouse.
The Dell support professionals can help you when you face any problem with your Bluetooth mouse. Following certain troubleshooting methods you can resolve the problem with your Dell Bluetooth mouse and obtain its normal functioning.
Step 1: You should first check the mouse battery by opening the cover of your Bluetooth Dell mouse. When the batteries get exhausted, you should replace this.
Step 2: There may be some error in setting the connection between your Bluetooth mouse and the PC. Restarting the Pc often solves this problem.
Step 3: One very important thing that you need to check is the Bluetooth connectivity of your PC. If you find any issue with the Bluetooth functionality of your PC, refer to the manual for turning the feature on.
Step 4: Finally, you should reinstall the Bluetooth software, in case your PC has Windows XP. Any problem with the installation of the blue tooth connection will prohibit your mouse from working on its normal way.
How can you Troubleshoot Windows Media Player issues?
 Playing any music on your PC is a common trend among the PC users. Windows Media Player is your media application present by default on your Microsoft Windows OS. Whenever you play music in your PC, the Windows Media Player caters you the experience you wish for.
But is this media application free of errors? Like any other software application, this Windows Media Player can at times show certain problems. You can seek Windows support to know about the different troubleshooting methods. It is possible to resolve any problem of Windows Media Player, if you can successfully troubleshoot the software.
In case you face any problem with the troubleshooting methods, you are free to consult the professional experts. Take a look at the steps here:

You should first make an attempt to update the Windows Media Player version. Visiting the Microsoft website, you can update your version of the default media application. If you have the latest versions or Windows Media Player 10, you can have the privilege of playing majority of the files without any codec download.
Troubleshooting the choppy or flickering video is your next task. Generally upgrading the Media Player version can resolve this issue. If not, you have to take resort of video acceleration for fixing the playback issue.
Finally, you should try to resolve the problem regarding full-screen playback. Often you are not able to watch a video on full screen. To fix this trouble, visitTools > Options > Performance > click Advanced tab > choose ‘enable full screen mode’.
How can you Create Backup in Outlook 2010?
![]() Windows 7 is the commonly used operating system nowadays. This OS offers you its backup software providing you various options for backing up your important files both automatically and manually. But these backup options do not include Outlook 2010 due to its way of storing the data. Is the idea not
Windows 7 is the commonly used operating system nowadays. This OS offers you its backup software providing you various options for backing up your important files both automatically and manually. But these backup options do not include Outlook 2010 due to its way of storing the data. Is the idea not
clear to you?
Well, in Outlook 2010 data is stored in the Personal Folder where files have the .pst extension. This is normally overlooked by the backup software.

Fortunately, Microsoft provides you the Outlook 2010 Export function which facilitates creating your backups of all important data and mails. You also get the privilege of storing these important files on a different drive other than the one where you have stored your Outlook files.
How to use this Export function?
- Opening the Outlook, click File > Open in Backstage > Import > a listing of actions will be displayed.
- Click Export to a file > Next
- Click Outlook Data File from the listing of file types > Next
- Click Outlook 2010 > Next
- Select a location where you can save the backup of the files. You are suggested to keep these files in some external drives or USB drive or DVD and CD.
- Set Replace Duplicates With Items Exported as default > click on Finish.
- You can locate the files in the Outlook by clicking File > Open > Open Outlook Data File.
For any difficulty with the process, call up the professional technicians available online.
How to resolve the unresponsive Dell Inspiron Touchpad or Mouse? | Digital Life – http://www.cubesquare.co.cc
 Dell Inspiron laptops and desktops have reached every household in the recent times. Are these systems free of errors? Certainly not. Issues have been detected with the touchpad or the mouse. It can become unresponsive, if you have corrupted driver setting. This issue can bug you, if you do not fix it on time. Proper troubleshooting methods are offered by the Dell Support experts. Seek their assistance right away!
Do you think that you have to get a new laptop or mouse? However, this is not the case always. A newly up-to-date driver is the ideal solution to regain the normal functioning of your touchpad or mouse. Here are the steps for you. Follow the steps and recover your lost settings easily.
♦ Don’t think that you can use this method only once. Try it again and again, if required.
Step 1 : Browse to “driversdr.com/dell/index.php?id=madldr1“. Once you have navigated, install Driver Navigator after downloading.
Step 2 : Open up the Driver Navigator and click on “scan now”. Wait for a few minutes. This program will recommend you certain drivers suitable for your purpose. Once you get the drivers, choose “update drivers”.
Step 3 : Once you have done all these, restart your Dell Inpsiron laptop or desktop. Your touchpad or mouse is sure to work in its normal way, if you are successfully in troubleshooting the issue.
Related articles
- How to resolve the unresponsive Dell Inspiron Touchpad or Mouse? (thinkanytime.wordpress.com)
- How to fix the problem of a Bluetooth-enabled Dell Travel Mouse? (thinkanytime.wordpress.com)


How to Obtain Microsoft Windows Updates
Jun 15
Posted by Nikesh Jain
There are two ways to obtain Microsoft Windows updates:
Here is how to turn ON Automatic Updates and help protect your Windows PC
» Instead, if you are under control panel category view, click Performance and Maintenance ► click System, and then click the Automatic Updates tab to choose the update option you want. Update option Automatic is recommended as it automatically downloads and installs updates at your chosen time.
| T h i n k A n y t i m e |
Send this to
Posted in How to, Tips & Tricks, OS - Windows 7, OS - Windows 8, OS - Windows Vista, OS - Windows Xp
27 Comments
Tags: -enabled, .com, 2000, 2003, 2007, 2008, 2011, 2012, 7, ?, a, AC power, Account, advertising, advice, affiliate, analytics, Any key, anytime, article, atom, Automatic Update, back, Backup, BATTERY, battery software, BIOS, blog, Blogger, Blogging, blogosphere, Blogs, Bluetooth, bluetooth connectivity, Bluetooth Dell, bluetooth mouse, boot, Booting, Business, chrome, co.cc, Command Prompt, comments, Computer, Computer file, content, Control Panel, Crash, create, Data, Data loss, Data recovery, deejay, dell, Dell Inspiron, dell support, Dell Support Center, Design, desktop mail, Disk Management, document, Download, DVD, Email, Email client, engines, Express, extensions, facebook, feeds, Files, find, Fix, for, Free, freelance, get, Gmail, google, grammar, Hard disk drive, Hardware, Hardware Support, HIBERNATE, History of the battery, Home, How, how to, Ideal solution, in, Inspiron, Intel Core, Internet, Internet Explorer, IPhone, iPod, is, jain, jobs, Laptop, leopard, Links, Linux, lion, Lithium-ion battery, loss, Mac OS X, Macintosh, mail messages, mail program, mail tab, make, malware, Marketing, Media, microblogging, Microsoft, Microsoft Outlook, Microsoft Windows, minds, MiniTool, money, Mouse, my, mycomputer, Networking, news, nikesh, nikesh jain, nyk jain, of, On, online, Operating system, Operating Systems, or, our, Outlook, Outlook Express, pack, Peripheral, Personal computer, Pictures], post, premium, problem, professional, promotion, Random-access memory, recovery, resilve, resolve, rss, search, Select (magazine), SEO, service, setting up outlook, setting up outlook express, Settings, SLEEP, Snow, Social, Startup company, Storage, The, the last thing, Themes, think, thinkanytime, tips, to, tooth connection, Touchpad, traffic, Travel, Tricks, Tricks and fun, Troubleshooting, troubleshooting methods, tumblr, tutorial, Twitter, unresponsive, vista, we are busy, Web browser, Website, when, Window, windows, windows 7, Windows Server Update Services, windows update, windows vista, windows xp, Wireless, wireless connectivity, wordpress, writing, xp, YouTube